Open Graph Data can be used by social media platforms like Facebook, X (formerly called Twitter), or Discord to add an image to your Starlight page links when sharing them.
The image URL can be defined using the og:image and twitter:image meta tags.
Starlight does not provide a built-in mechanism to automatically generate these images using all the available route data and add the corresponding meta tags to your pages.
This guide will show one possible way to do so using astro-og-canvas which uses an Astro endpoint to generate the images.
The generated images can be customized using a large set of options including size, colors, fonts, logos, and more.
Prerequisites
You will need to have an existing Starlight website.
Install astro-og-canvas
Start by installing the astro-og-canvas package:
npm install astro-og-canvaspnpm add astro-og-canvasyarn add astro-og-canvasbun add astro-og-canvasni astro-og-canvasCreate the image endpoint
astro-og-canvas provides an OGImageRoute helper that can be used to create an endpoint that will generate the various images for all documentation pages.
To do so, we need to do the following:
- Get a list of all documentation entries from the
docscontent collection used by Starlight. - Map the entry array to an object with the page ID as key and the frontmatter data as value.
- Pass down the object to the
OGImageRoutehelper. - Define a
getImageOptionsfunction called for each page to customize the generated image.
The following example will create the endpoint in a src/pages/og/[...slug].ts file:
import { getCollection } from 'astro:content'import { OGImageRoute } from 'astro-og-canvas'
// Get all entries from the `docs` content collection.const entries = await getCollection('docs')
// Map the entry array to an object with the page ID as key and the// frontmatter data as value.const pages = Object.fromEntries(entries.map(({ data, id }) => [id, { data }]))
export const { getStaticPaths, GET } = await OGImageRoute({  // Pass down the documentation pages.  pages,  // Define a function called for each page to customize the generated image.  getImageOptions: (_id, page: (typeof pages)[number]) => {    return {      // Use the page title and description as the image title and description.      title: page.data.title,      description: page.data.description,      // Customize various colors and add a border.      bgGradient: [[24, 24, 27]],      border: { color: [63, 63, 70], width: 20 },      padding: 120,    }  },})
Visiting the endpoint will now generate an image for the page matching the slug parameter.
For example, visiting /og/getting-started.png would generate an image for the getting-started page.
Customize head route data
The next step is to customize the head route data which is an array of all tags to include in the <head> of a page used by Starlight when rendering a page to add the og:image and twitter:image meta tags containing the URL of the generated image.
Create a route data middleware which is a function that is called every time Starlight renders a page to modify values in the route data object.
import { defineRouteMiddleware } from '@astrojs/starlight/route-data'
export const onRequest = defineRouteMiddleware((context) => {  // Get the URL of the generated image for the current page using its ID and  // append the `.png` file extension.  const ogImageUrl = new URL(    `/og/${context.locals.starlightRoute.id || 'index'}.png`,    context.site,  )
  // Get the array of all tags to include in the `<head>` of the current page.  const { head } = context.locals.starlightRoute
  // Add the `<meta/>` tags for the Open Graph images.  head.push({    tag: 'meta',    attrs: { property: 'og:image', content: ogImageUrl.href },  })  head.push({    tag: 'meta',    attrs: { name: 'twitter:image', content: ogImageUrl.href },  })})
Configure Starlight
The last step is to configure Starlight to use the route data middleware and to define the site Astro option.
The site option contains the deploy URL of your documentation website as Open Graph images require a valid URL having the http or https scheme.
The following example will configure Starlight in the astro.config.mjs file:
import { defineConfig } from 'astro/config'import starlight from '@astrojs/starlight'
export default defineConfig({  // Define the deploy URL of the documentation website.  site: 'https://example.com',  integrations: [    starlight({      // Use the route data middleware to add the Open Graph images.      routeMiddleware: './src/routeData.ts',      title: 'My Docs',    }),  ],})
Preview the generated images
Using opengraph.xyz, you can preview the generated images for your documentation pages.
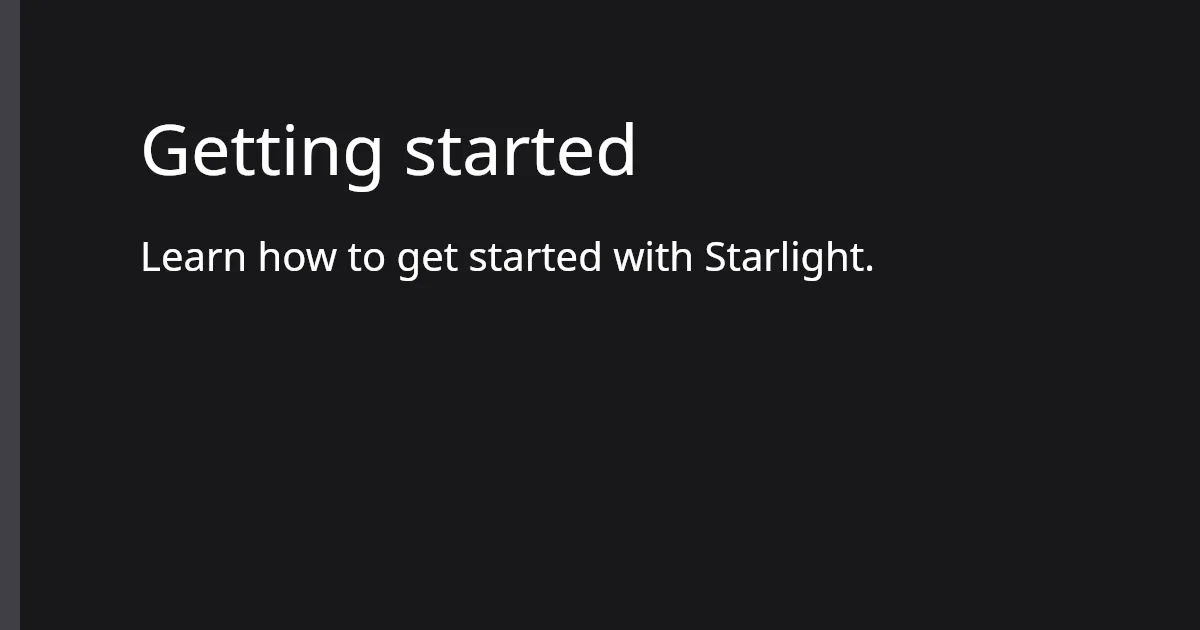
For example, given the following src/content/docs/getting-started.md file accessible at https://example.com/getting-started:
---title: Getting starteddescription: Learn how to get started with Starlight.---
My documentation page content.
The following meta tags will be added to the page:
<head> <!-- ... --> <meta property="og:image" content="https://example.com/og/getting-started.png" /> <meta name="twitter:image" content="https://example.com/og/getting-started.png" /></head>And the following Open Graph image will be generated:
Up to you to customize the image using the various options provided by astro-og-canvas.
You can find the complete source code of this guide in this StackBlitz example.